Did you know that transferring a Dynamics 365 Business Central Cloud (SaaS) tenant to another BC Cloud (SaaS) tenant no longer requires Microsoft support? Simply go to the Admin Center and use the new Environment Transfer action. This feature is particularly useful for partners who set up an instance and need to transfer it to a Customer Tenant after UAT. It’s also helpful when a Customer’s (end user’s) domain or tenant changes. The process is straightforward and can be completed quickly and easily by anyone.
Table of Contents
Steps to Transfer an Business Central Environment Directly from Admin Center
First of all, please understand that the transfer process works for different Tenant ID Business Central Cloud instances. If you want to move internally within a tenant, there is no need to use the transfer interface; just use the Copy option to copy the instance. Now, coming back to our points on transferring BC environments between tenant IDs, you must follow the steps below.
How to Transfer Business Central Cloud Instance / Environments from One instance to another Fast and cost effective ?
Steps1: Select Environment: Choose the Business Central environment(s) you want to transfer.
As mentioned first and foremost step is to identify the right environment you want to transfer after opening your Business Central Cloud Admin Center Screen.
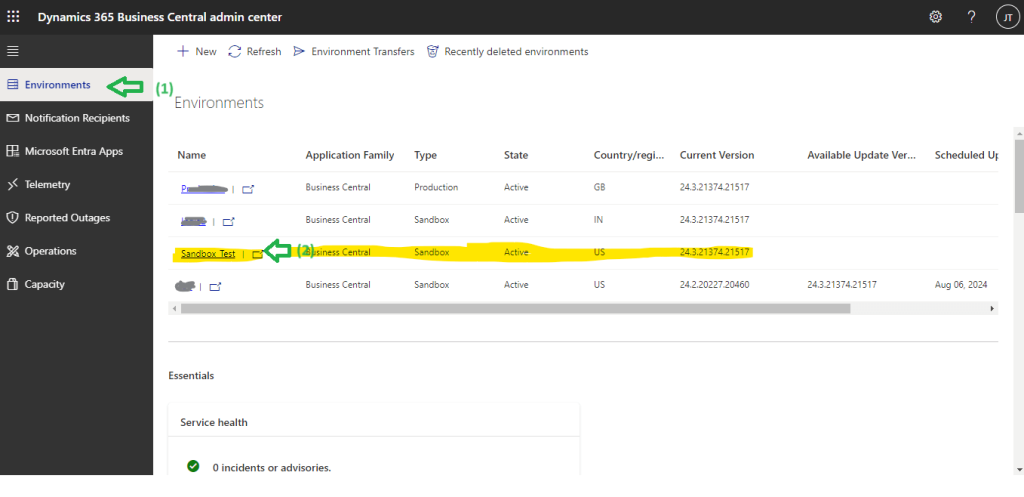
For example current screen I will show how to transfer Sandbox Test instances highlighted.
Steps2: Initiate Environment transfer from Admin Center.
On this step required click on “Environment Transfers” button like mentioned on following image click Transfer
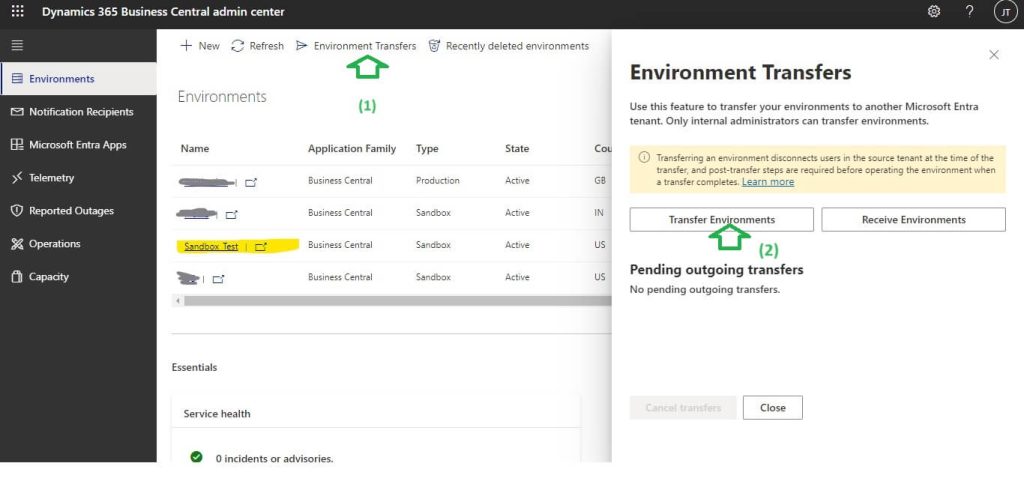
Next Step is to perform following
- a) Choose the transfer required Environment / Instance
- b) Enter the Microsoft Entra tenant ID of your destination on the “Specify the Destination Microsoft Entra tenant ID”. ( This is the unique identification of each environment. If don’t know this then I will tell you easy to step to identify this is check the special text displayed immediately just before “/admin” URL you are login on the destination Dynamics 365 Business Central Admin center.
- c) Now Click on Transfer Button to finalize source activity. ( Refer upcoming image)
As shown in the following screen, you also have the option to select multiple environments, such as one Production and one Sandbox. Additionally, you are free to choose your preferred date and time for transferring the environments.
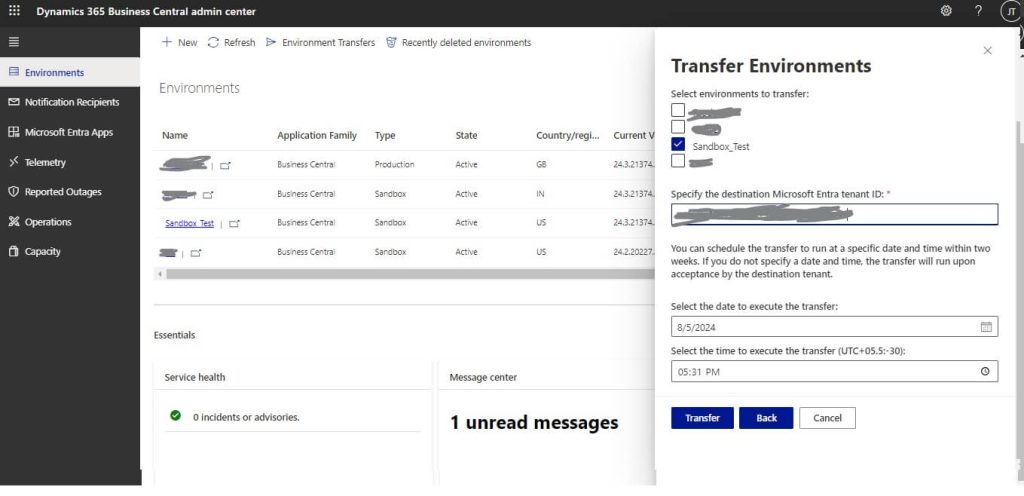
After initiate this transfer any time you are free to cancel the transfer within the time period. For more details on conditions visit below.
Important Points to note while Transferring BC Instance:
- Initiate Transfer: An internal admin (not a delegated admin) must start the transfer in the source tenant’s Admin Center.
- Accept Transfer: An internal admin in the destination tenant’s Admin Center must accept the transfer for it to proceed.
- User Disconnection: All users in the source tenant will be disconnected during the transfer, and the environment will no longer be available there.
- Pending Transfers: Check the status on the Pending outgoing transfers list in the source tenant.
- 8-Hour Acceptance Window: The destination tenant must accept the transfer within 8 hours. If not, the operation will be marked as Skipped.
- Licenses and Quota: Ensure there is at least one paid user license and enough environment and storage quota in the destination tenant.
Hurray!! Here complete the Source location Admin center activity. Now pending task is to received the same on Destination.
Steps 3: Enter Destination Tenant ID: Specify the Entra tenant ID of the new tenant.
From this step Destination admin center activities are starting. Open the final destination D365 Business Central Admin center page where instance receiving required
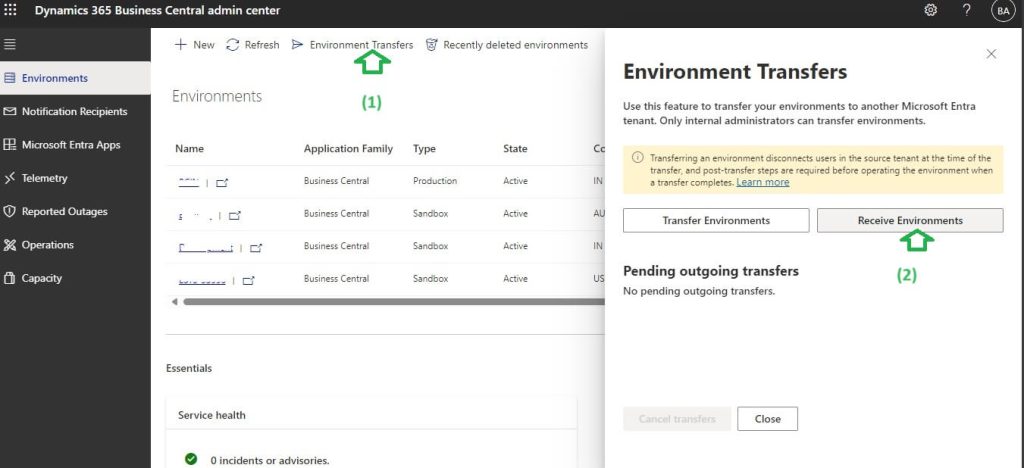
Here Step 1 is to Click on Environment Transfer then Step 2 is to Click on “Receive Environments” button. After this step following screen will come and will ask to enter the Source Microsoft Entra tenant ID. ( If you are struggling to get this then recheck the hint I have given while taking Receiving location tenant ID above on Step 2).
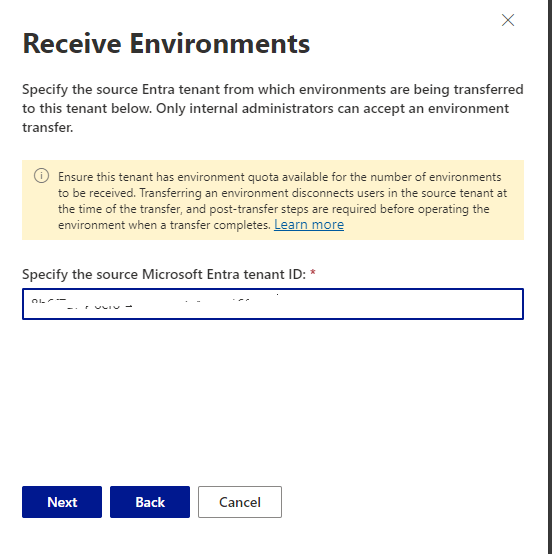
Next Step is to Click on “Next” button. After doing you will get Pending Incoming Confirmation screen shown on next step.
Steps 4: Confirm the Environments at Destination
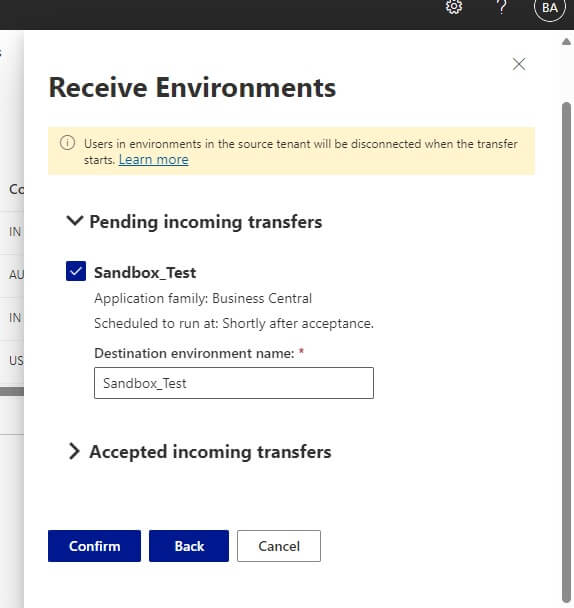
This screen as mentioned you have to choose the Pending Incoming Transfers Environment showing to finalize. Click on “Confirm” button to finalize the steps.
So simple right.
FAQ : Business Central Cloud Interface Transfer
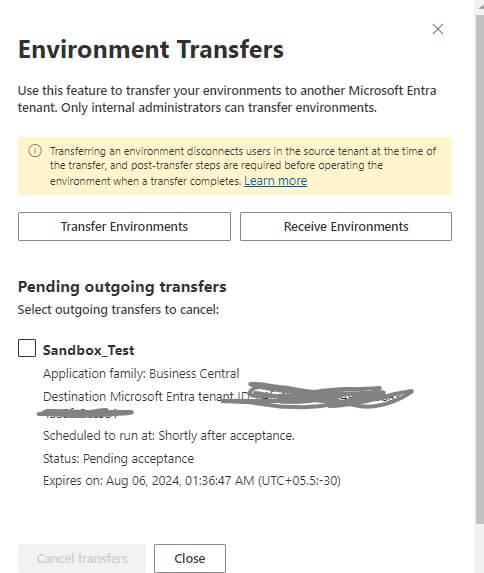
How to check whether Transfer request submitted proper on Business Central Admin Center?
You may check the same by clicking environment Transfer button once again on source Business Central Admin center screen and choosing Transfer Environment button. Further to that you will get result similar to following.
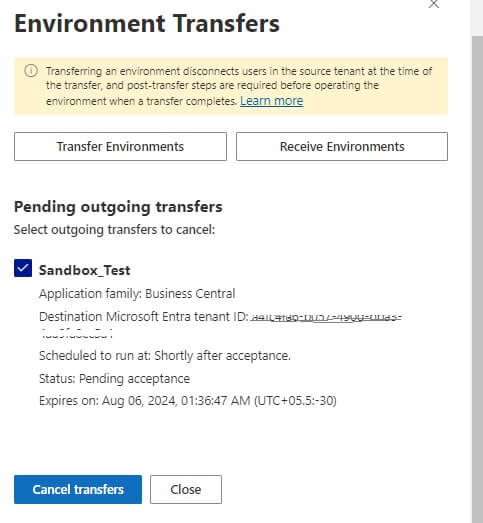
How to Cancel the Transfer request after Confirming from Source Location?
You can do the same by opening source Business Central Admin center screen and choosing Environment Transfer button and then choosing ‘Transfer Environments’ button. Further to that system will display pending transfer Cloud Instance initiated for Transfer. Choose the one you want to cancel and then press “Cancel Transfers“.
Hope this post help you for transferring Business Central Cloud (SaaS) Environment Source tenant to Destination. Your feedbacks most welcome.


